Home Gym Essentials

I'm not gonna lie.  

Having a workout room within my home has been a lifesaver.  Actually, it's been a SANITY saver.  

If you're a sweat-a-holic (like myself), then you probably know what I mean.  Being able to workout, break a sweat, and get those endorphins flowing can really make or break a day.  Especially when you're a work-from-home-mama.  And even mores when you have kids as strong-willed as mine. Ha!

Ok, now I know everyone can't have a full room dedicated as a "gym" in their home.  But really, all you need is a little space in the garage, guest room, or living room, and invest in some basic equipment to be able to consistently get in a GREAT workout and meet your fitness goals.  

It can be a little daunting when you google "home gym equipment".  You could spend TONS of money filling up a room with equipment that guarantees you success.  I promise, you don't need all that junk.  Save yo time - and money! 

Here are my personal home-gym "must haves":  

1) Adjustable dumbbells.  We have the Bowflex brand, but I know there are other options out there.  This makes it easy to change the weight you're using without having to own 25 different pairs of dumbbells.  I know they're not cheap, but they're worth it.  You actually pay more per pound when buying individual dumbbells.  

GymPic4.jpg

2) Resistance bands.  I got a set of these Home Complete bands off of Amazon for a great price.  They have lasted about 2 years now and seem to be holding up just fine.  These are great for adding resistance to squats, kickbacks, deadlifts, etc.  I am linking a different brand because I can't find that particular brand.  But these are comparable. (Oh, and sorry for the nice wet spots on the gym mat. My lovely children spilt apple juice in there and I hadn't found all the spots - until now. Haha!)

3) Kettlebell (or two).  These little puppies are great for doing kettlebell swings (duh), lunges, deadlifts, squats, and even arm exercises like tricep extensions, bicep curls, and upright rows.  I recommend getting at least two sizes: one heavier one for leg moves and a lighter one for upper body.  (The one pictured is 15 pounds.)

4) Gloves.  I'm here to tell ya: not all gloves are created equal.  I have spent decent money on a pair of "name brand" gloves just to have them wear down within 2 months of lifting 4 days a week.  Wah waaaaah.  These Barehand Gloves are a little pricier, but worth it in the end.  I've been consistently using them for over 5 months now and haven't noticed a change in their padding or the way they assist with my lifts. Not to mention, their "half hand" design means no more sweaty/itchy palms!  Hollaaaa!

5) Yoga Mat and Foam Roller.  These two inexpensive pieces of equipment are essential for stretching/cooling down post-workout.  Obviously, if you have carpet in your home, you may not "need" the mat, but I think it's helpful not to get sweat stains all over the floor.  The foam roller is awesome at releasing the fascial tissue (the covering over your muscle that allows it to contract and slide) so your muscles can recover and new muscle fibers can be recruited.  It's one of those hurts-so-bad-but-feels-so-good things, but you'll get used to it. (PS: Those shoes are Nike Free RN FlyKnits and they. are. AMAZING.)


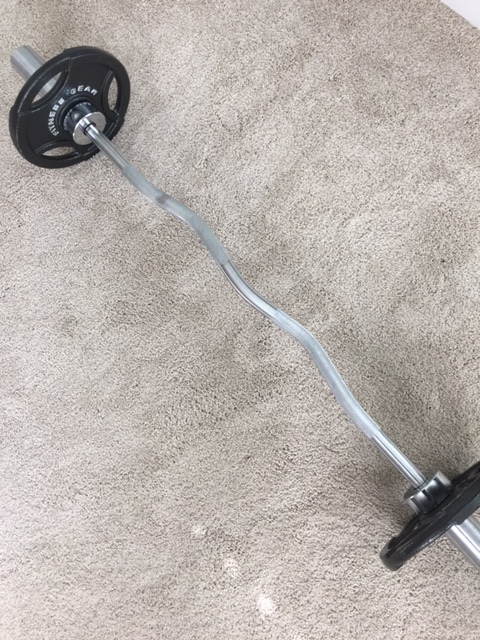
6) EZ Bar.  If the next piece of equipment isn't in your budget right now (or if you don't have the room for it), then this is a good alternative.  The zig zag handle makes it great for bicep curls and deadlifts, but I will admit it makes it a little awkward for squats/lunges where it's against your neck.  But oh well - you make due with what you have!  Remember, too, that you can only load this bar up with as much weight as you can press up and over your head.  So if you're wanting to do "heavy" squats (i.e.: 45 pounds or more), you might want to highly consider the next piece of equipment.  

7) Half rack and bench.  I know, I know.  This is definitely a piece of equipment that comes with a price tag and demands some space.  But it is 110% WORTH IT.  We are able to do squats, deadlifts, bench presses, pull-ups, lat pulldowns (using resistance bands), glute bridges, etc. with this combo.  We use it every single time we workout, so we've for sure gotten our money's worth out of it.  Keep in mind, you have to purchase the olympic bar/free weights separately.  But that allows you to get a few weights you know you'll use to begin with and then purchase the rest when you can.  (Side note: This particular rack is MAJORLY on sale right now.  IJS!)

Now, you may notice I didn't list ANY cardio equipment.  That's because you don't need it!  I actually own an elliptical that I ONLY used during my pregnancy with the McNugget.  It's sitting out in the garage waiting to find a good home because I just don't use it!  I don't do a lot of cardio, but when I do, I opt for HIIT (high intensity interval training).  You don't need any equipment, it's way quicker, and you can burn fat for up to 24 hours post-workout.  So (in my opinion), if you're going to spend the money on gym equipment, skip the treadmill and all that jazz and invest in the pieces I talked about earlier.  

There ya go, my fit peeps!  If you have ANY questions about any of this equipment, let me knoooow!  Happy lifting, y'all! 

Blessings!

XOXO

Macros, Macros, Everywhere...

Ahhh, macros.  

Counting macros can be both a blessing and a curse.  It is time consuming, can be a pain in the tukus when you go out to eat, and it really messes with a gal's nut-butter addiction.  

BUT it also can do AMAZING things for your body and in helping you reach your fitness goals.  Whether you're "bulking" (eating a surplus of calories) to help gain lean muscle or "cutting" (eating in a deficit) to shed any extra fat and show off those new muscles, it's a great fitness tool to use.  

I'm sure you're wondering: but how can I BEST use this tool?? 

Well, let me make this point clear first: COUNTING MACROS IS NOT FOR EVERYONE.  If you have a tendency to feel overwhelmed, don't do it.  If you are suffering from an eating disorder (or tend to regress in your recovery from one), don't do it.  And if you're not 100% committed to the process, don't do it till you get your mind right and are ready to put in the work.  

Ok, now that I've gotten that little disclaimer out of the way, let's talk MACRO TIPS.

  1. KNOW YOUR NUMBERS.  The best way to get started with tracking macros is to know how many calories your body needs to maintain your current weight ("maintenance calories").  There are loads of calculators online that will help you find this number (such as this one), OR you can let me help you (by going here).  Once you have that number, you can plug it into an app like My Fitness Pal and get a ratio of the macronutrients you need.  This can be a bit tricky and take some tweaking, but at least you can have a base number to work off of.
  2. SLOWLY INCREASE/DECREASE YOUR GOAL NUMBERS.  When trying to lose weight, I always say it's better to start about 200 calories below your maintenance number.  If you're trying to build lean muscle, I recommend starting off by adding 100 calories above maintenance.  Every two weeks, reassess how you feel and if you have made any progress (but ignore that scale because it LIES!).  If you are seeing progress, stay where you're at for another two weeks.  If you feel you need to make some changes, increase or decrease by only 100 calories at a time.  Then give yourself ANOTHER two weeks to let your body adjust to the changes.  
  3. SPLIT UP THE SERVING SIZE SO THAT YOU CAN ENJOY ALLL THE FOODS YOU LOVE. Even when I'm tracking my macros and trying to keep them within a certain goal range, I never tell myself "oh, I can't eat that".  That's restrictive and not healthy - especially when you have a history of restriction/binging like I do.  Instead, I just split up the serving sizes and add a little of everything I'm craving!  Such as Square Organics protein bars*, which I am OBSESSED with.  They average about 13g of (unprocessed, natural) sugar per bar, which is a lot when I'm trying to limit my sugar intake.  So how do I incorporate this deliciousness into my day?  I cut the bar either into half or thirds, dice it up into little chunks, and then throw those puppies into my morning oats with some fresh fruit and other goodies.  Craving: satisfied!  (PS: If you've never done this, you MUST.  The hot oats melt the chocolate and it gets all gooey and just UMPH!)
  4. EAT THE MAJORITY OF YOUR CARBS IN THE MORNING.  Then taper off throughout the rest of the day.  No, I don't mean don't eat any carbs in the evening or for a bedtime snack.  But if you eat carb-heavy meals in the morning, you both give yourself more fuel throughout the day AND ensure that you won't be trying to stuff in a ton of carbs at night to hit your goal.  
  5. PLAN YOUR DAY AHEAD OF TIME (IF POSSIBLE).  I have found that my best "macro days" are those that I have planned ahead.  It may sound like a waste of time, but you're actually spending the exact same amount of time pre-planning that you are plugging numbers in during meals or after the fact.  And what can I say?  I'm a planner at heart.
  6. BUY AND PREP IN BULK.  We tend to make better food choices when we have healthy, prepped foods on hand at all times.  So spend those 3-4 hours on the weekend buying and prepping your proteins, carbs, and veggies.  I promise your days will be a lot easier and your macros will be much more consistent! 
  7. DON'T GET DISCOURAGED.  Like I said, it takes our bodies an average of two weeks for our bodies to get used to a change in macros.  This goes for both bulking and cutting.  Those first two weeks you increase your caloric intake, you may feel more bloated and go to bed with a food baby.  The first two weeks you decrease calories, you may feel like you're not seeing a change in the scale even though you're eating less.  Just be patient, give your body a chance to adjust, and THEN you can make the necessary tweaks to your goal numbers. 
  8. WATCH YOUR SALT AND SUGAR INTAKE.  Salt (sodium) retains water.  So the more salt you take in, the more water your body will hold onto.  Not cool, dude!  Personally, my body is VERY sensitive to salt, so I have to be extra conscious of how much is in the foods I eat.  I like to keep my sodium intake below 1500mg a day, which is a whole lot easier to do when you prepare your own meals and eat lots of whole foods!  My body responds the same to excess sugar - my belly tends to bloat if I eat more than about 40g of sugar a day (including the natural sugars in fruit).  Remember that everyone is different, and everyone's bodies respond differently to foods.  Just because someone else you follow on Instagram can eat 100+g of sugar a day (even if it's natural) or add sea salt to everything doesn't mean YOUR body will like it.  If you notice that although you're hitting your macros, you are still bloated or have stubborn fat around your middle, take a second to really evaluate your salt/sugar intake. That could make all the difference! 
  9. REMEMBER THAT NOT ALL MACROS ARE CREATED EQUAL.  Just because I track my macronutrients does not mean I believe in the "if it fits your macros" fad.  So what if you have enough left for a Snickers bar.  How is that bar going make you feel after eating it?  What's REALLY in it?  And what happens when you're hungry 30 minutes after eating it because it doesn't have enough fiber or protein to keep you full?  It may be tempting, but no thanks.  I look closely at the ingredients and choose WHOLE, nutrient-dense foods to fuel my body.  This helps my body perform better, grow more lean muscle with added fat, improves my mental focus and energy without the mid-day crash, and just makes me FEEL GOOD inside and out.  And that's what really matters, right?

Now, I get asked all the time on Instagram what my own macros look like.  Here's a little breakdown of how I have gone about my bulk so far: 

  • Maintenance: 1800 calories, 45% carbs, 27% protein, 28% fat. 
  • Jan 1st: INCREASED to 1900 calories, 45% carbs, 30% protein, and 25% fat.
  • Jan 15th: INCREASED to 2000 calories, 45% carbs, 30% protein, and 25% fat.  
  • I'm due to reassess Jan 29th (tomorrow) and may increase to 2100 calories, 47% carbs, 28% protein, and 25% fat.  But I'll be sure to keep you posted!

I hope that helps shed a little light on how to use macro-tracking to your advantage.  And please please pleeeeease remember this, y'all: this is your journey, your body, your goal.  Do what works for YOU!

Blessings!

XOXO

*Use my code "fit_n_clean_mama" for 20% off and free domestic shipping

The Results Are In...

..."and our blood test confirmed you are NOT the father!!!" 

GASP!

[Excuse my while I die laughing at my dorky self - bahaha] 

Sorry, guys.  Had to.  I'm good now. 

Now where were we?  Oh yeah. 

So the time has come my friends...to finally share the results of my Pinnertest Food Intolerance test.  Yaaaay!

If you're confused as to what I'm talking about, let's me break it down for ya.  I have struggled with gas/bloating/fatigue/low energy levels for YEARS now.  I'm talking half my lifetime, at least.  When I started changing my eating habits back in 2014, I cut out gluten and then dairy. Within two weeks, I noticed DRASTIC improvements in my energy levels, bloating, and other digestive issues.  Since I've had my second baby, I've been seeing a return in some of those symptoms, but I've been unable to pinpoint what foods are actually causing the trouble now.  Hence why I took the Pinnertest.  

I took the test back in the beginning of December, but haven't posted the results sooner because I wanted to give myself time to eliminate the foods that were listed as intolerances for me and see what happens.  I mean, what good is taking an intolerance test if you don't do something about the foods that are bugging your body.  Amiright? And I wanted to give you guys the best review of the product/process possible so you can decide if it's something you should do, too.  

First, let me explain what this test actually is used for:

  • When we are intolerant to foods, our bodies basically don't produce the necessary enzymes needed to break down and digest these foods.  This means they sit in our guts and start to ferment (gross).  This leads to gas, bloating, abdominal pain, weight gain, and inflammation throughout the body. To read more about what actually happens when you're intolerant to foods here.
  • Keep in mind that food intolerances are different than food allergies. Intolerances occur when your body lacks the enzymes to digest the food properly, leading to those unpleasant symptoms.  This reaction is usually not immediate, but seen over a period of time.  Allergies occur when your body recognizes foods as "foreign" and starts trying to fight against it.  This reaction is immediate (such as swelling of the mouth, throat, hives, etc.) and can be life-threatening.  **Pinnertest does NOT diagnose food allergies, so if you feel that you or a loved one has a true allergy, please see a physician! 

Ok, now let's talk about the collection process:

  • After ordering, you'll receive your test within 2 business days. (If you're impatient like me, that's a major plus - haha!)  When you first open your product (in it's cute little box), you'll notice you have the collection kit (alcohol swab, lancet for pricking your finger, collection pad, and bandaid), consent, pre-paid return envelope, and instructions.  That's IT.  It's not filled with a bunch of complicated stuff.  Lay everything out before you get started to make sure you have all of the necessary pieces.
  • Next, you follow the super simple instructions they give you to collect your blood.  All they need is a a few DROPS of blood, y'all, so don't let this part deter you from taking the test! I am a nurse, but I'm actually a baby when it comes to pricking my finger, and I swear this didn't hurt.  Promise. 
  • Once you've collected your sample, you sign the consent (stating this is your blood and you give permission for the test to be performed), stick the collection pad in the envelope, and pop it into the mail.  Easy peasy! 

And lastly, let's talk about getting your results:

  • Pinnertest will send you an email when they have received your blood sample and began testing.  The testing usually takes between 7-10 business days (not including holidays).  My testing was actually done around Christmas, so my results were delayed by, like, two days.  No biggie.
  • Your results will come in an email and are very easy to read.  There are two columns--red (intolerant) and green (not intolerant).  If the food is listed under the red column, your body has shown a negative reaction to it, and it's recommended that you avoid eating it.  If it's listed under the green column, your body didn't show a reaction to it, and you should be free to continue eating it.  
  • There are little numbers next to the foods you're intolerant to (1-3).  This indicates the reaction level noted by your body; 1 = low reaction, 2 = moderate, 3 = high.  Obviously, if you have a moderate to high reaction to a food, it's a given to say you should avoid it.  But even if you have a "1" reaction, Pinnertest suggests that you avoid eating it in order to allow the inflammation in your body to heal.  Better safe than sorry! **By the way, Pinnertest includes all of this information with the test results, so you can refer back to them at any time if you're unsure what it means.

I'm sure you're like "okay, okay. But what did your results SAY?!" 

Here ya go: 

I am moderately intolerant (2+) to COW'S MILK (no offense, but DUH - I bloat up like a toad frog and can't poop for a week after I eat dairy!) and SOYBEANS (didn't expect that one!).  That's it - that's all I'm technically "intolerant" of! 

I know what those of you who have been following for a while are thinking: What?? No gluten intolerance?! Then why the gluten-free diet?? 

Good question!

I actually did not show a true reaction to gluten/wheat products (or bell peppers/onions), which totally surprised me.  When I contacted the company about this, they said that although some people don't show an intolerance on the test, that doesn't mean that their bodies don't just have a hard time digesting a certain food.  

I also shared my results with one of the Gastroenterologists I work with, and he explained it like this: sometimes people cut certain foods out of their diet (such as gluten, in my case) thinking that's the issue and feel better doing so.  However, it may not actually be that particular food that was causing the issue, but perhaps something else that was in WITH that food that was causing the reaction.  Many gluten-containing products also contain some form of soy, which I have shown to be intolerant to.  So, in theory (listen to me getting all technical-schmetical - haha), I could actually have noticed an improvement in my symptoms from the lack of SOY and not the lack of GLUTEN/WHEAT.  Wow.  Mind. Blown. 

When I stop and think about it, that makes a lot of sense.  I have been noticing more symptoms lately, even though I eat a gluten-free diet.  When I went back and started looking at the foods I eat on a regular basis, MANY of them contained some form of soy products (lecithin, soybean oil, etc.).  I never even thought about that being the issue!  With that said, I will still likely stick to a gluten-free diet, but only because I just feel better when I do.  But I won't feel the need to be a stickler about it and not have some good, wholesomely-made bread or pasta from time to time.  

So, the next question is: what do you DO with this information? Like I said before, Pinnertest recommends that you eliminate those foods that you body had a reaction to.  The BEST way to do this (in my opinion and through personal experience) is to just cut them out cold turkey.  Don't try to "wean" yourself off a certain food, because if your body is truly intolerant to it, then ANY amount is going to cause a reaction/inflammation.  Just be very mindful of what ingredients are in the foods you're eating, avoid those that you're intolerant to (to the best of your ability), and give it some time.  Most people start to see some improvement of symptoms within a few weeks.  

In my case, I have eliminated soybeans for the last 2.5 weeks (and I already avoid dairy products).  It's taken me longer at the grocery store since I have to pay even closer attention to foods I usually buy, but it's worth it to get my body back to normal!  Since doing this, I HAVE noticed a difference in bloating, digestive issues, and fatigue.  I feel more energized and not as "foggy".  Hollaaaaa!  

Now comes the most IMPORTANT question: would I recommend you spend your money on this test??

YES.  Hands down, 100%, yes.  I feel that it is SO important to LISTEN TO YOUR BODY.  This includes nurturing it with wholesome/real foods, staying active, getting enough rest, and paying attention when it appears that something is causing your body distress.  Not to mention, when you are in-tune with your body and know how good you feel on a regular basis, it's easier to pinpoint the times when sometimes is seriously wrong (such as autoimmune disorders, blood disorders, or cancers).  So, yes, I believe this test is something everyone with digestive/fatigue issues should consider taking for themselves!

Now, because I LOVE YOU GUYS...I got you a discoooount coooode!  Oot oot!  If you go here and use the code FITNCLEANMAMA, you'll get $60 off your test.  There's no expiration date and you can order multiple tests at once and receive the discount on every. single. test. #SCORE

As an gastrointestinal nurse, fitness professional, and FRIEND, I sincerely hope this test benefits you guys as much as it has me.  Happy testing, you guys, and cheers to healthy guts! :)

Blessings,

XOXO